How to Mod your BOSS DF-2
So now I offer just the circuit board and parts on their own to build your own Leyland Modded BOSS DF-2, I’ll use this blog post to show you how to use them and also if you don’t want to buy my thing, you can make your own stuff and do it completely independantly. Free information!
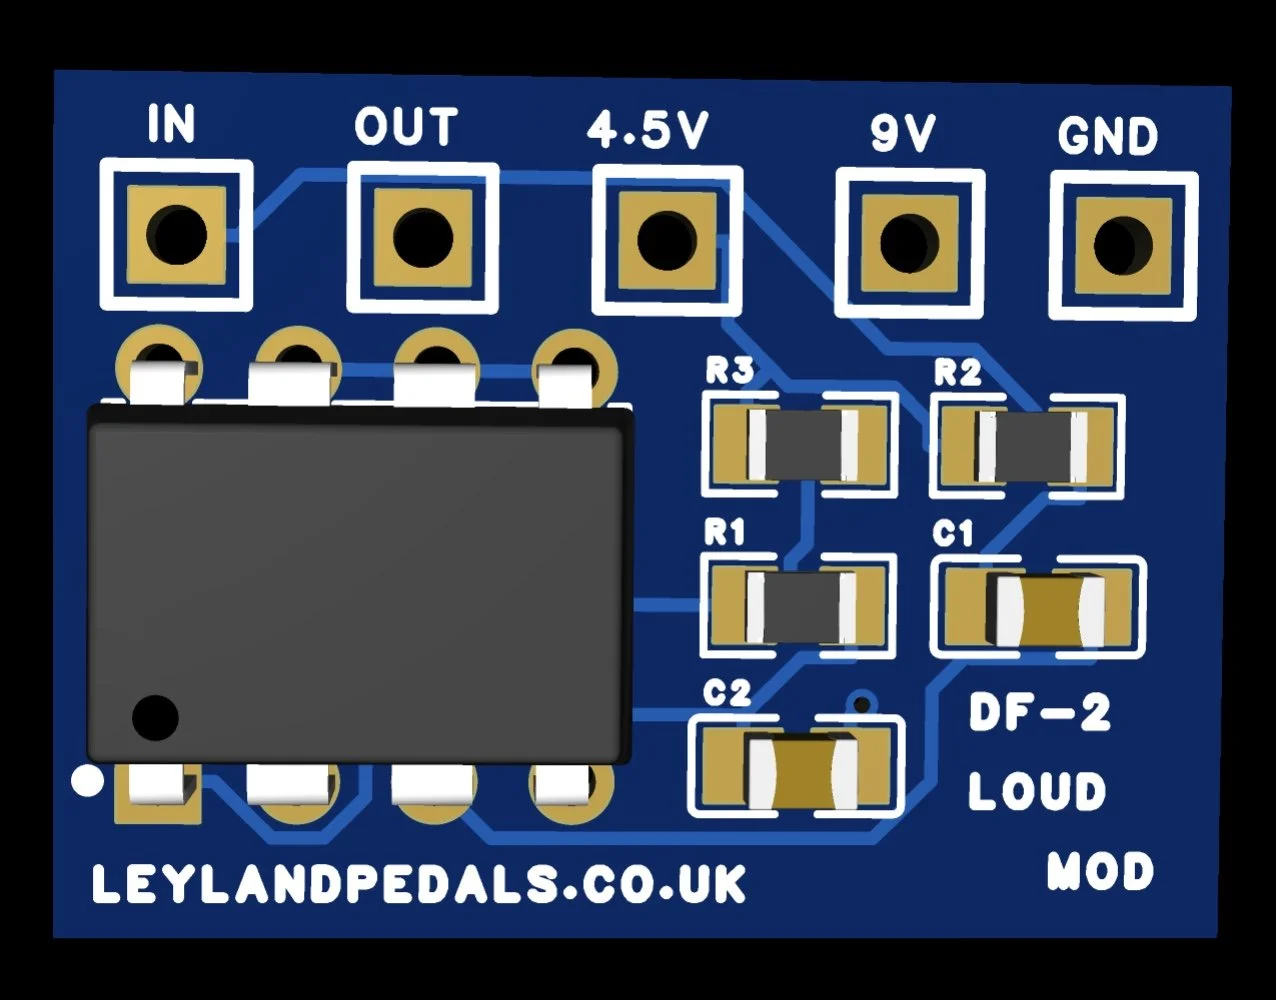
First off, you’ll want to solder all the parts to the board. I’m assuming you know how to solder. If not there are plenty of great videos on the internet about it, including how to solder and strip wires which you’ll also need to do. The parts are all labelled on the board, you’ll just have to get them in the right way. Make sure you line the dot on the opamp up with the notch in the picture on the circuitboard. Make sure all the joints have plenty of solder on them, but aren’t touching each other. You can check this with the continuity setting on a multimeter, and reflow the joints if they’re connected where they shouldn’t be.
Strip back one end of every wire and solder them into their respective hole using this colour scheme:
9V - red
0V - blue
4.5V - yellow
IN - white
OUT - black
2. Open the back of the pedal, and pull the circuit board out a little bit. Be careful not to break any connections. Also open the battery door, and remove the battery if there is one. Find where the battery connector wires are soldered to inside the pedal, and cut/desolder them. Remove the battery connector as you won’t be needing it anymore, and you need the access hole for the new wires you’re putting in.
3. Place the board inside the battery compartment, and thread all the length of the wire through the hole the battery connector was threaded through. You may have some difficulty getting this to fit, although it is possible. You may have to extend the slot with a small drill bit if you’re really having trouble. Make sure you have some sort of foam/tape/plastic on the bottom of the board so it doesn’t end up shorting on anything. Anything non-conductive works great.
4. While you’re in here, I would recommend modding the pedal to take 9V power instead of 12V power. All you do is solder together the connections that you see in the white square - on your pedal they shouldn’t be soldered yet. Make it look like the picture and you’re golden.
5. You want to first find these three connections first:
9V (red)
Ground (blue)
4.5V (yellow) — ignore the wire that is already soldered to the yellow connection on mine, you won’t have that yet.
Solder the corresponding coloured wire to these places. Make sure you get the red wire on the correct terminal, and not the one the battery used to connect to.

6. Probably the hardest step, unsolder R19. R19 is the resistor between the two connections squared in red on the picture, and it needs to be removed for the mod to work. My personal easiest way of doing this is heating up the connections, then poking a thin wire or component leg into each of the holes until the resistor falls out. Take your time with this, you don’t want to damage anything by overheating, or heating the wrong thing.
7. Once it’s out, make sure you retrieve it from flopping about inside the pedal. You can then solder your IN/White wire onto the connection on the Right, and your OUT/Black wire to your connection on the Left.

Now that everything is soldered up, I highly recommend testing. Now that the battery is gone, use your power jack with a 9V power supply (provided you did the 9V mod) and give it a go. It should be way louder! Some common faults I have had are:
Shorts on the board (make sure everything you solder has just enough solder to make a connection, but not enough to flow onto other pads and cause problems)
Input and Output connected the wrong way (the pedal will barely output any signal, and it will be really scratchy. You just need to flip the input and output connection either on the board or on the pedal)
Be careful where you lay the wires as you close everything back up. Remember to put the plastic back in place over the main circuit board, and make sure you have the insulation under the small circuitboard too. Keep the wires in the battery compartment out of the way of the switch and the spring when closing. You’re done!